How do I add my business logo and brand colors to Shopify?
In Shopify, you upload your logo and set your brand colors from Settings, then General, then Store asset. Click Brand to open the Brand page, where you add a default logo and a square logo, then set primary and secondary colors with hex codes. These brand assets act as a default source for compatible themes, checkout, and social sharing, but you may need to connect them manually if your theme does not pick them up automatically.
Quick answer
Go to Settings, then General, then Store assets, and click Brand. In the Logos section, upload a default logo (PNG or JPEG, minimum 512 pixels wide) and a square logo (minimum 512x512px). Under Colors, set a primary color and its contrasting color, then add secondary colors if your plan supports them. Secondary colors are not available on the Starter plan. Click Save.
Upload your logo
- From your Shopify admin, go to Settings, then General.
- In the Store assets section, click Brand.
- In the Logos section, add or select a default logo from your files, or drag and drop an image.
- Repeat the process to add a square logo.
- Click Save.
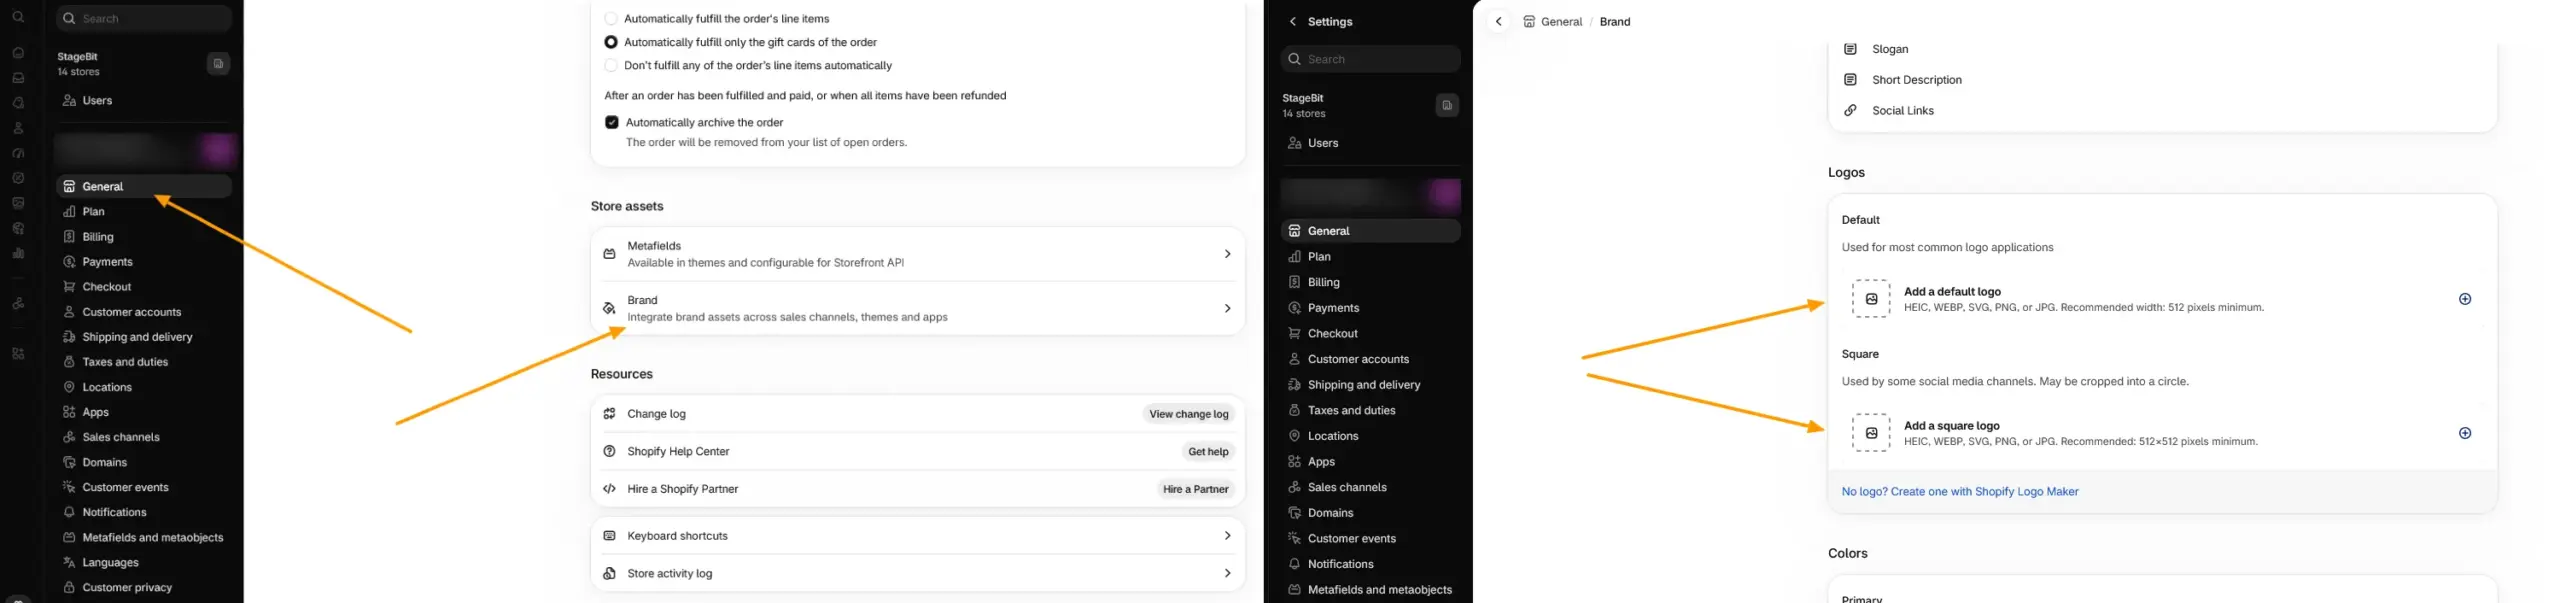
Shopify accepts PNG or JPEG for both logo types, according to Shopify’s brand assets documentation. The default logo needs to be at least 512 pixels wide. The square logo needs a minimum of 512x512px, since platforms use it for social profiles and app icons, and some crop it into a circle. Avoid margins or padding around the mark itself, since extra space can make your header logo look smaller once it’s placed in your theme. You can only have one file per logo type, though you can replace either one at any time.
Set your brand colors
- From Settings, then General, then Store assets, click Brand.
- Under Colors, click the plus sign in the Primary section and choose a color with the picker, or enter its hex code.
- Set the contrasting color for your primary color.
- In the Secondary section, click the plus sign to add a secondary color, and optionally a second one.
- Set the contrasting color for each secondary color.
- Click Save.
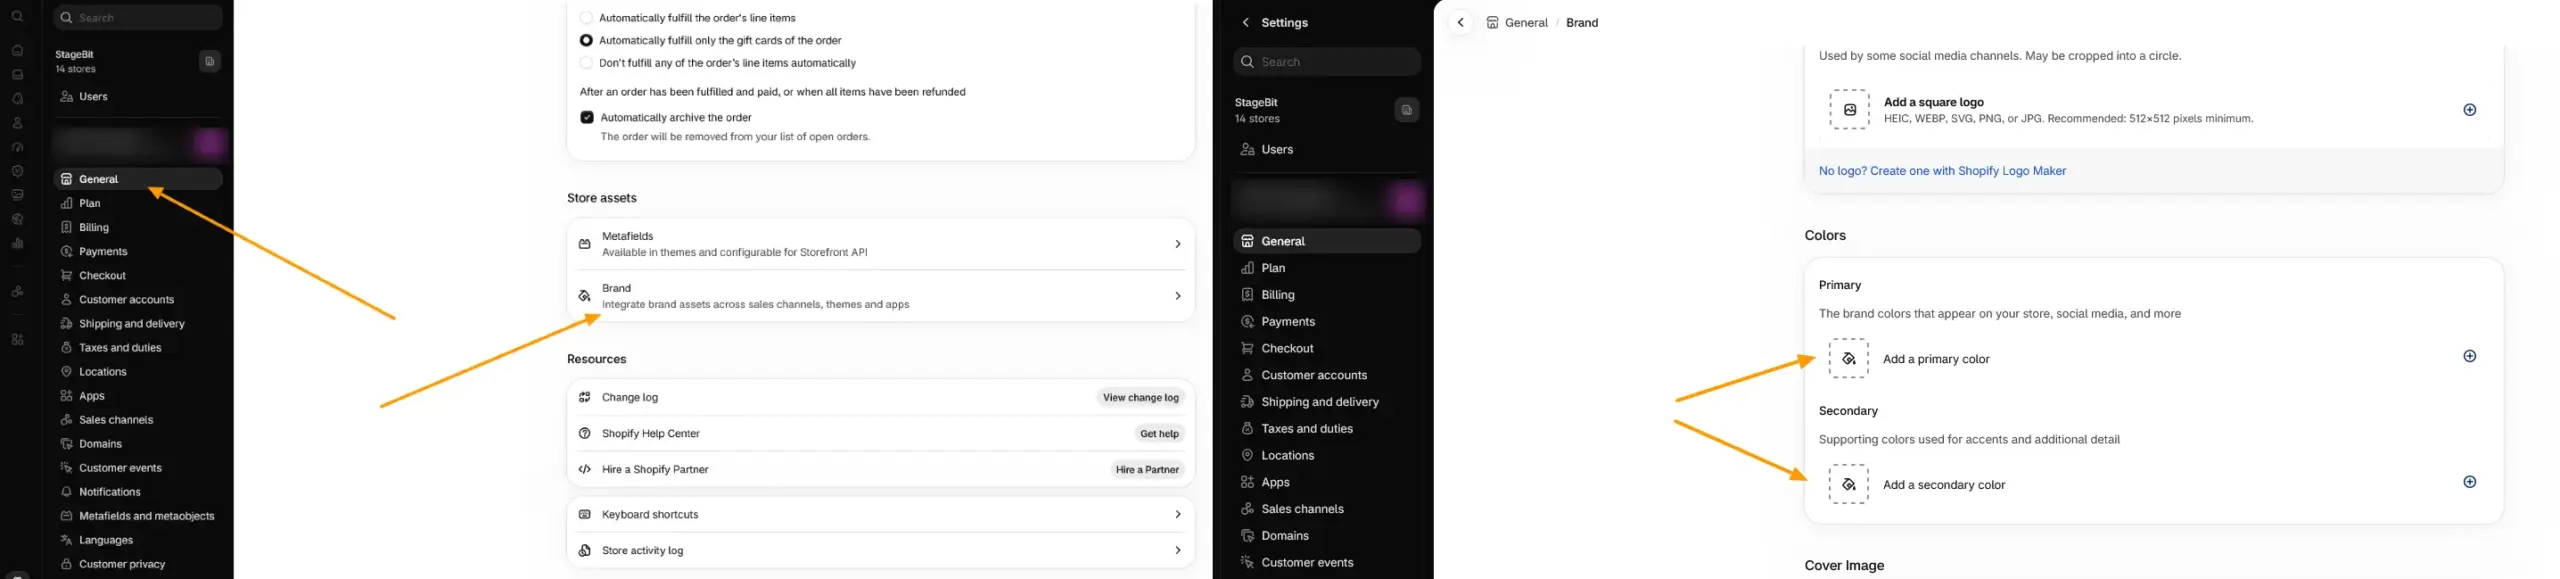
Secondary colors are not available if your store is on the Starter plan. Enter your exact brand hex codes rather than eyeballing a shade on the picker, so your storefront stays consistent with your other marketing materials.
Why your storefront might not change right away
Brand assets are a default source, not a forced override. Compatible themes pull your logo and colors in automatically, but vintage themes or heavily customized themes often do not. If your logo doesn’t appear after saving it here, open the theme editor, go to Theme settings, then Logo, and click Connect dynamic source to select the asset manually. This is a common gap on older or custom-built themes, and it usually needs a developer to confirm theme compatibility or wire the connection by hand. Our Shopify development team checks this as a standard part of every branding setup we do.
Brand colors are not the same as your theme’s color settings
The colors you set on the Brand page feed compatible themes as a default. They don’t automatically overwrite color choices you’ve already made elsewhere in your theme, and the underlying color system itself varies by theme version. Older themes and most current themes use color schemes, coordinated sets of background, text, and button colors assigned per section. Newer themes are shifting to a different model. Horizon 4.0.0, for example, uses a color palette system instead, a single flat grid of named colors that any section or block can reference directly, according to Shopify’s developer changelog. If you want full control over every button, background, and text color on your storefront, check Online Store, Themes, Customize, Theme settings, Colors, and confirm your brand colors actually carried through.
Extending your branding to checkout and customer accounts
Your Brand assets don’t automatically style your checkout. To add your logo, colors, and fonts there, go to Settings, then Checkout, and click Customize next to the checkout configuration you want to edit. This opens the checkout and accounts editor, where you can set a logo, background, and accent colors specifically for checkout. Some of what you set there also carries through to your new customer account and sign-in pages.
Don’t have a logo yet? Shopify’s free Logo Maker tool can put one together in a few minutes, and the files it generates are ready to upload straight into Brand assets once you’re happy with them.
Set the logo and colors once in Brand assets, then check both your storefront preview and your checkout editor to confirm they actually show up in both places. If they don’t, the assets themselves are almost always saved correctly. The gap is usually whether your theme, or your checkout configuration, is actually connected to pull from them.
Related Answers

Still need help?
Questions about getting your Shopify branding to actually show up?
If your logo or colors aren't carrying through to your theme or checkout, we're happy to take a look and figure out what's blocking it.