How do I start a Shopify store from scratch step by step?
Setting up a Shopify store from scratch isn’t complicated once you break it into stages: get your business basics sorted, configure the store, add products, connect payments and shipping, then test before going live. Here’s the full process, in order.
Quick Answer
Sign up for a free Shopify trial, pick a plan (Basic, Grow, Advanced, or Plus), set up your domain and theme, add your products, connect Shopify Payments or another gateway, configure shipping and tax settings, add your required policy pages, then test checkout with a sample order before removing the storefront password to launch. Most stores can complete this in a few days to a couple of weeks, depending on catalog size and how much theme customization is involved.
Before You Start: Get Your Business Basics Right
Before you touch Shopify, get clear on what you’re actually building. This isn’t a Shopify setting, it’s decision work that determines how you’ll configure everything after it.
- Pick a niche and know who you’re selling to. A specific niche is far easier to market than “everything for everyone.”
- Decide your model: your own inventory, dropshipping, print-on-demand, digital products, or wholesale/B2B.
- Have a rough product list ready, including variants and pricing, so setup doesn’t stall halfway through.
Steps to Build and Launch Your Shopify Store
Step 1: Create Your Shopify Account
Go to shopify.com and start a free trial. As of 2026, that’s a 3-day free
trial with no card required, and most new merchants can then continue for $1/month for their first three months on
the Basic, Grow, or Advanced plan (this promo doesn’t apply to Starter or Plus, and promotional terms can change).
Pick your store name carefully since it becomes your default myshopify.com address, though you can
add a custom domain later. Skip or answer the onboarding questions, then you’ll land in the Shopify Admin, which is
where everything happens from here.
Step 2: Pick Your Plan
Under Settings → Plan, choose the subscription that fits where your business is right now. For a full online store, Shopify has four core plans:
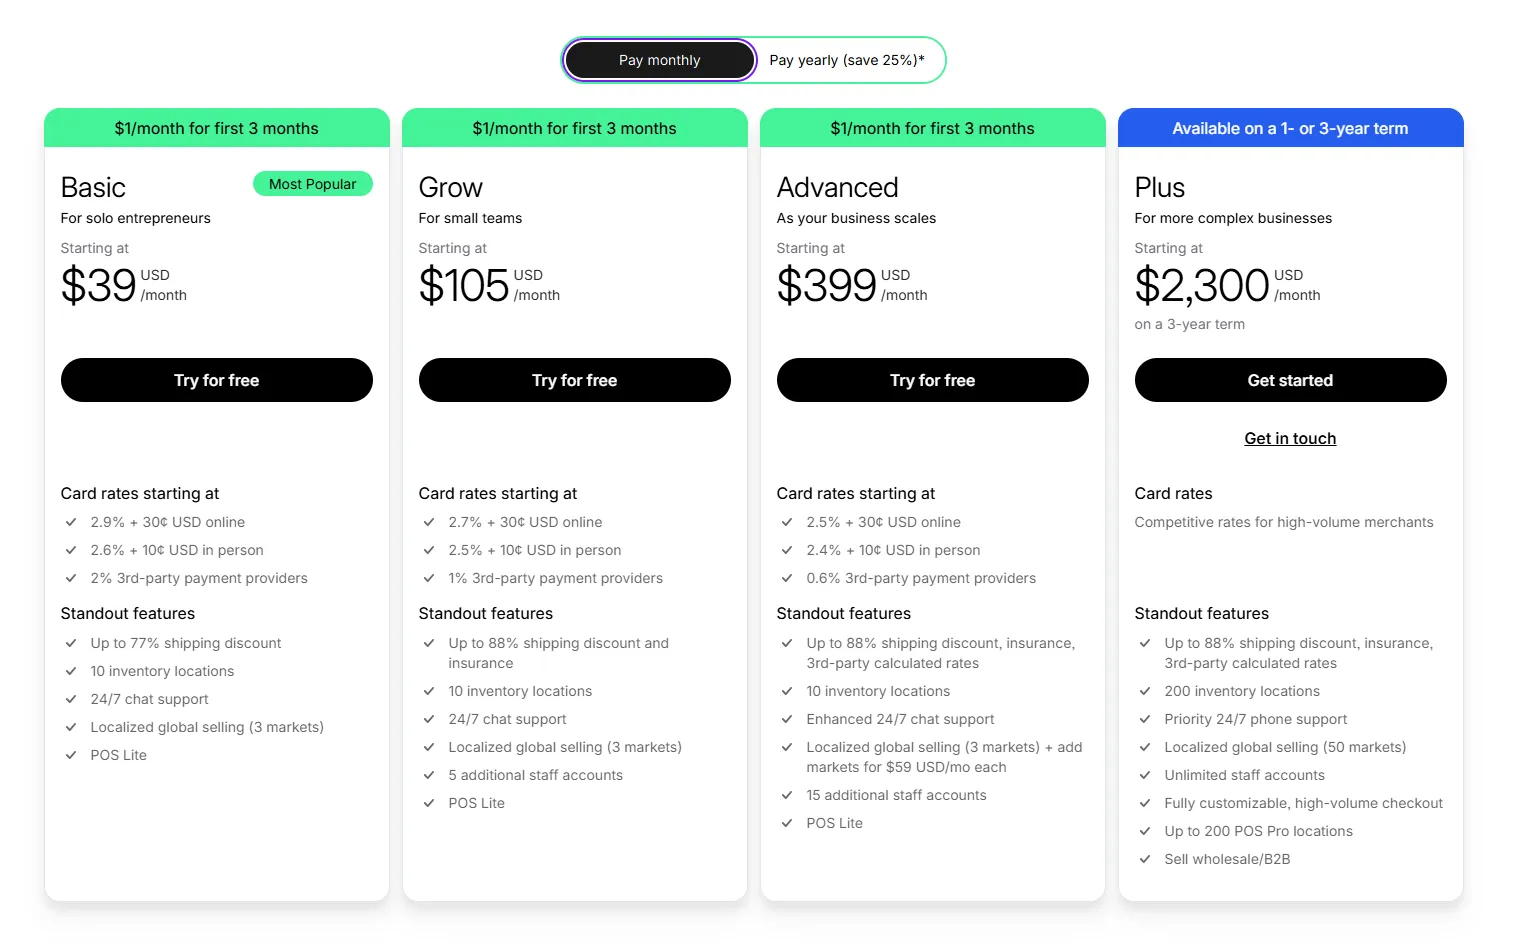
- Basic: enough to launch and sell, though it comes with no additional staff accounts
- Grow: more staff logins and lower payment processing rates (this used to just be called the “Shopify” plan)
- Advanced: deeper reporting and the lowest standard rates
- Plus: enterprise and high-volume B2B, custom pricing
Most new stores start on Basic and upgrade once volume justifies the lower transaction fees. There’s also a separate, cheaper Starter plan, but it’s not a full storefront, it’s a checkout link for selling through social and messaging apps, with no theme or blog. Plan names and exact rates shift periodically, so confirm current details on Shopify’s own pricing page before committing.
Step 3: Configure Core Store Settings
Handle these before you add a single product:
- Store details: legal business name, store email, phone, and address under Settings → General
- Store currency: set under Settings → General (or Store details)
- Timezone: affects order timestamps and reporting
- Units of measurement: weight units for shipping calculations
- Billing: your payment method for the Shopify subscription itself, under Settings → Billing
Step 4: Add Your Products
Go to Products → Add product and fill in:
- Title and description: clear, benefit-driven copy that also does SEO work
- Images: high-quality and a consistent aspect ratio across your catalog [INSERT: confirm current recommended product image dimensions from Shopify’s own documentation]
- Pricing: retail price and, optionally, a compare-at price for showing a discount
- Inventory and SKU: turn on inventory tracking if you want stock counts and alerts
- Variants: size, color, material, or whatever options apply
- Shipping: weight and dimensions so rates calculate correctly at checkout
- Search engine listing preview: customize the meta title and description per product
Group related products into Collections so customers can browse by category.
Step 5: Choose and Customize a Theme
Go to Online Store → Themes and browse the Theme Store. Shopify’s own free themes, including Dawn and the newer Horizon, are genuinely solid starting points and cover most store types without costing anything. Paid themes typically run a one-time fee [INSERT: confirm current typical price range for paid Shopify themes], and are worth it mainly for extra layout options or a more distinctive look.
Once you’ve picked one, use the theme editor to:
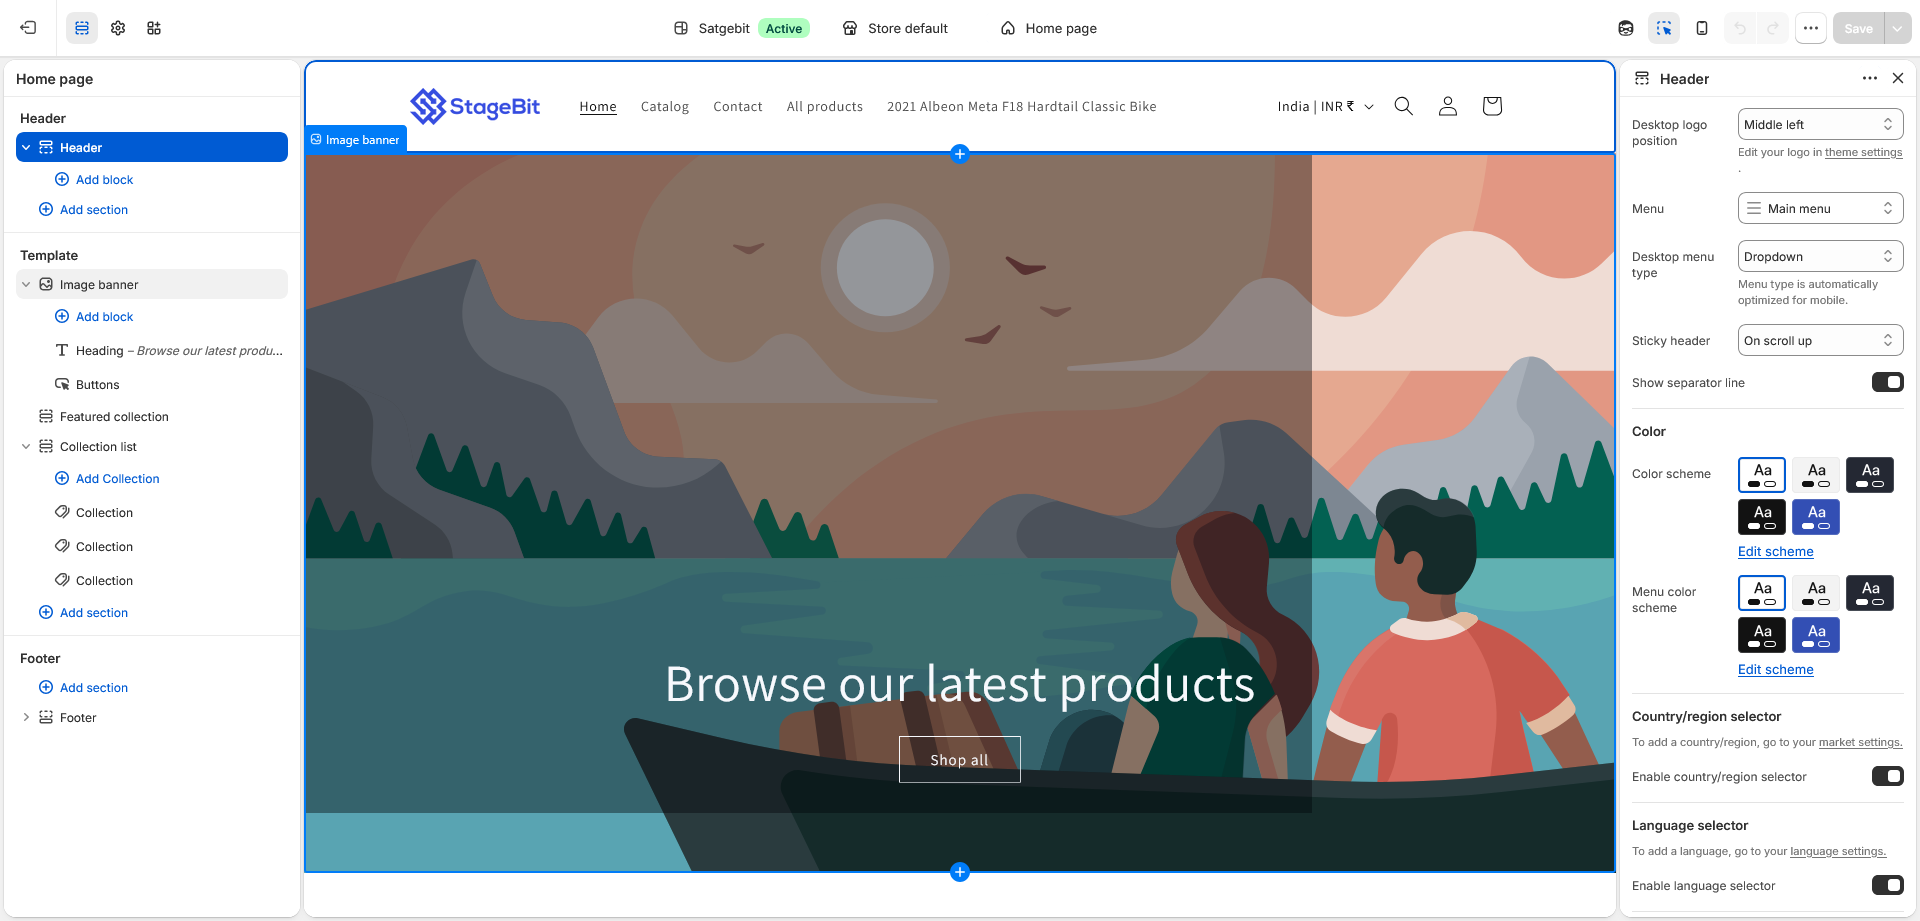
- Upload your logo and set brand colors and fonts
- Build out homepage sections (banners, featured collections, and so on)
- Set up header and footer navigation
- Customize product, collection, and cart pages
Check everything on mobile before you publish. Most storefront traffic is mobile.
Step 6: Set Up Your Domain
Under Settings → Domains, you can either buy a domain through Shopify (pricing varies by domain extension, [INSERT: confirm current Shopify domain registration price range for a .com]) or connect one you already own by updating its DNS records to point to Shopify. Set your chosen domain as primary so traffic resolves correctly. Shopify issues a free SSL certificate automatically once the domain is connected.
Step 7: Set Up Payments
Go to Settings → Payments. Where it’s available, Shopify Payments is the simplest option: it’s built in, supports major cards plus Shop Pay, Apple Pay, and Google Pay, and avoids the extra transaction fee that Shopify charges when you use an outside gateway. You can add PayPal alongside it, or use one of the third-party gateways Shopify supports in your country if Shopify Payments isn’t available where you’re based.
If you want to offer buy-now-pay-later, Shop Pay Installments is built in, but it’s currently available only to stores and customers in the US, Canada, and the UK, and requires both Shopify Payments and Shop Pay active on the account. Merchants outside those three countries typically add a third-party BNPL app instead.
Step 8: Configure Shipping
Under Settings → Shipping and delivery, set up shipping zones (domestic, international, or specific countries) and rates for each: flat rate, free shipping above a threshold, weight- or price-based rates, or carrier-calculated rates on eligible plans. If different products need different shipping rules, set those up as separate delivery profiles, and confirm your fulfillment location(s) are correct.
Step 9: Set Up Taxes
Go to Settings → Taxes and duties. Shopify calculates applicable tax rates automatically for most regions based on your store’s location and the customer’s address, but it doesn’t file or remit taxes on your behalf. Review your GST/VAT setup, mark any tax-exempt products, and configure duties for international orders if relevant. This is one area where it’s genuinely worth checking with a tax professional rather than assuming the defaults cover you.
Step 10: Add Legal Pages
Under Settings → Policies, Shopify provides templates you can generate and customize for a refund policy, privacy policy, terms of service, and shipping policy. Edit them to actually reflect how your business operates, then link them in your footer.
Step 11: Build Your Navigation
In your Shopify Admin, go to Content → Menus to manage your store’s navigation. Set up a main menu (your key collections, About, Contact) and a footer menu (legal pages, FAQ, blog, social links). Keep both short. A cluttered menu hurts conversion more than it helps discovery.
Step 12: Install Essential Apps
The Shopify App Store covers most needs: email marketing (Shopify Email, Klaviyo), reviews (Judge.me, Yotpo), SEO, upsells, loyalty programs, and accounting integrations (QuickBooks, Xero). Install only what you’ll actually use. Every app adds some page weight, and a bloated app stack is one of the most common reasons stores end up slow.
Step 13: Test Everything
Before going live, place a test order. Use Shopify Payments’ built-in test mode if that’s your gateway, or the Bogus Gateway to simulate transactions without moving real money if you’re on a third-party processor.
- Run through checkout on both desktop and mobile
- Confirm order confirmation emails and shipping rates display correctly
- Check product pages for accurate pricing, images, and descriptions
- Click through every navigation link and legal page
Step 14: Remove the Password and Launch
Go to Online Store → Preferences, find password protection, and turn it off. Your store is now public. Announce it wherever your audience already is, and start driving traffic through SEO, ads, or organic content.
After You Launch
- Connect Google Analytics 4 and Google Search Console
- Set up Google Merchant Center if you want visibility in Google Shopping
- Start building your email list right away. It’s the one channel you fully own
- Check your Shopify Analytics regularly and adjust based on what’s actually converting
When to Bring in a Developer
This process covers a standard store built on an off-the-shelf theme with Shopify’s built-in tools. If you need custom checkout logic, a heavily modified theme, B2B pricing, or a migration from another platform with a large product catalog, that usually goes beyond what the admin dashboard alone can handle cleanly. Our Shopify development team handles that kind of build regularly.
Following these steps gets a standard store from signup to launch-ready without writing any code. Where it usually breaks down is custom design work, complex shipping or tax rules, and large catalog migrations, all of which are worth scoping properly before you start rather than discovering the limits mid-build.
Related Answers

Still need help?
Stuck on the parts that go beyond a stock setup?
If theme customization, a gateway that isn't available in your country, or migrating an existing catalog is slowing you down, we're happy to walk through what's actually involved and what your options are.