How do I connect my custom domain to Shopify (GoDaddy, Namecheap, Cloudflare)?
You can connect a custom domain to Shopify one of two ways. If you bought the domain through GoDaddy, Cloudflare, or IONOS, Shopify can connect it automatically by logging into that account directly. For Namecheap and any other provider, you connect it by adding DNS records manually. Either way, the domain stays registered with its original provider, and Shopify only hosts the store behind it.
Quick Answer
Go to Shopify admin > Settings > Domains > Connect existing domain and enter your domain without www. If you bought it through GoDaddy, Cloudflare, or IONOS, click Connect automatically and log in to that account. For Namecheap or any other provider, add an A record (23.227.38.65), an AAAA record (2620:0127:f00f:5::), and a www CNAME record (shops.myshopify.com) at your DNS settings. If you manage DNS through Cloudflare, set those records to DNS only, not Proxied, since Shopify doesn’t support Cloudflare’s proxy. Full propagation and SSL provisioning can take up to 48 hours.
Start the Connection in Shopify
- In your Shopify admin, go to Settings > Domains.
- Click Connect existing domain.
- Enter your domain, such as example.com. Leave out www at this stage.
- Click Next.
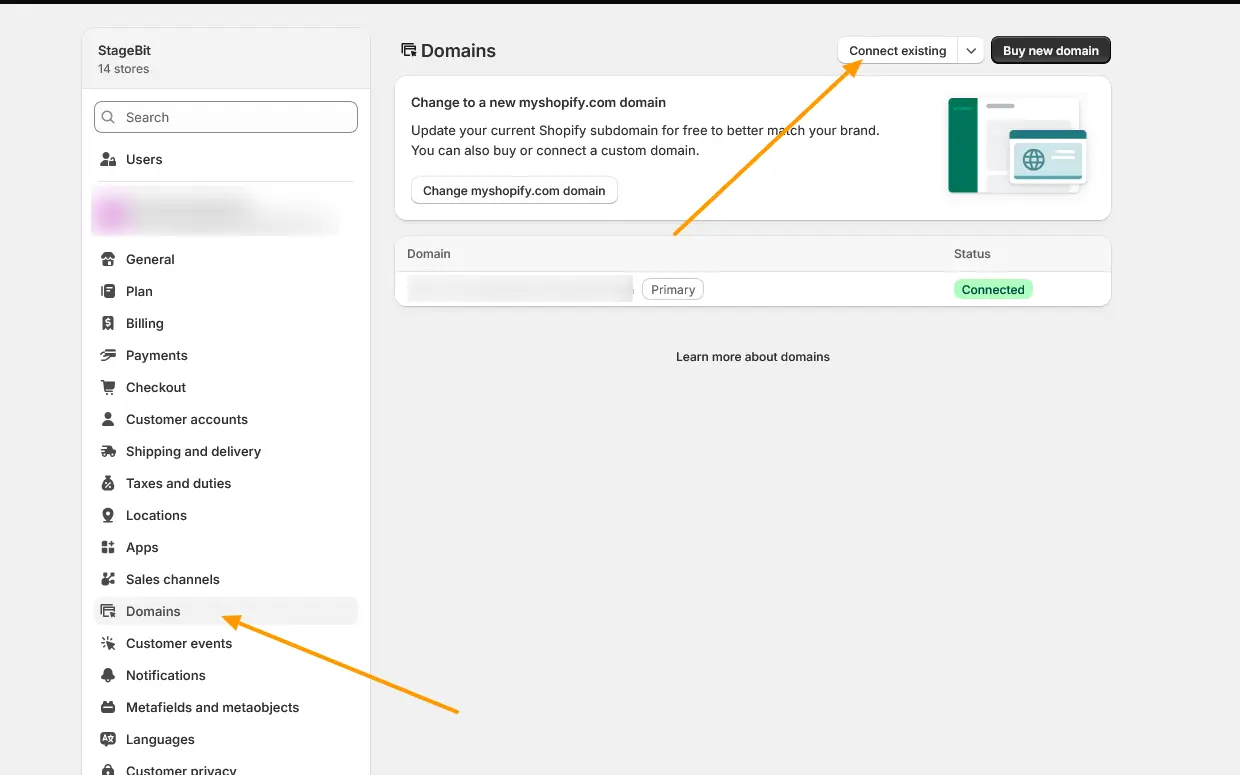
Shopify then shows either a Connect automatically button or manual DNS instructions, depending on where your domain is registered.
Connect Your Domain by Provider
GoDaddy
GoDaddy is one of the providers Shopify can connect to automatically. After clicking Next above, click Connect automatically, sign in to your GoDaddy account, click Connect, then Close. Shopify configures the DNS records for you.
If automatic connection isn’t available or fails, connect manually instead. In your GoDaddy Domain Portfolio, open the domain’s DNS settings, set the A record to the IP address shown in Shopify (usually 23.227.38.65), and set the CNAME record for www to shops.myshopify.com. If Shopify asks for extra verification, add the TXT record it provides.
Namecheap
Namecheap isn’t one of Shopify’s automatic-connect providers, so you’ll always connect it manually. In Namecheap, go to Domain List, click Manage next to the domain, then open Advanced DNS. Namecheap has a built-in DNS Templates option, and choosing Shopify from that list fills in the correct A and CNAME records for you. If you’re connecting a subdomain instead of the root domain, add the CNAME record by hand rather than using the template, since the template targets the root domain and www.
If Shopify requests additional verification, add a TXT record with the host shopify_verification and the unique value shown in your Shopify admin.
Cloudflare
Cloudflare also supports Shopify’s automatic connection. Click Connect automatically, sign in to Cloudflare, and approve the connection. If you connect manually instead, go to DNS > Records in Cloudflare and add the A record, AAAA record, and www CNAME using the values Shopify shows you.
Warning: Keep Cloudflare’s Proxy Off
Cloudflare proxies traffic by default, shown as an orange cloud icon next to a DNS record. Shopify doesn’t support this. If the A, AAAA, or CNAME record pointing to Shopify stays proxied, Shopify usually can’t finish SSL certificate provisioning, and visitors may see a message saying the domain isn’t configured correctly. Click the orange cloud on each of those records so it turns gray, which sets it to DNS only, and leave it that way permanently, not just during setup. This applies whether you connected automatically or manually, since the proxy can get switched back on later without you noticing.
If Shopify Asks for a TXT Verification Record
Shopify sometimes requires extra verification, most often when a domain is already connected to a different Shopify store. When this happens, Shopify shows a unique TXT value in your admin. Add that exact value to your DNS settings using a TXT record named shopify_verification, then return to Shopify and confirm you updated the records. Use only the value shown for your domain. A value copied from another site or guide won’t verify anything.
Setting the Domain as Your Primary Domain
- Go to Settings > Domains.
- Select your connected domain.
- Click Change domain type.
- Select Primary domain and save.
Shopify allows one primary domain per store. Any other connected domains, including the default myshopify.com address, can redirect to it.
DNS Issues That Can Quietly Break the Connection
- More than one A record or AAAA record pointing to different places
- DNSSEC enabled on the domain, which Shopify doesn’t support for third-party connections
- A CAA record that doesn’t allow Let’s Encrypt, Google, or SSL.com to issue certificates
- Nameservers pointed somewhere that doesn’t expose the DNS records Shopify needs to see
A domain can look correctly configured in Shopify and still fail to get its SSL certificate for one of these reasons, so check this list before opening a support ticket.
How Long the Connection Takes
DNS changes usually take effect within a couple of hours, but propagation can take up to 48 hours depending on your provider. Shopify also issues a free TLS certificate automatically once the domain connects, and that can take up to 48 hours as well. If your domain still shows SSL pending after that window, work through the Cloudflare proxy, DNSSEC, and CAA checks above before contacting support.
Connecting a domain doesn’t move its registration. Whoever you bought the domain from, GoDaddy, Namecheap, Cloudflare, or otherwise, still handles renewal and registration going forward. Shopify only takes over where the domain points. If you’d rather have someone check the DNS setup before you switch live traffic over, our Shopify development team can look at it with you.
Related Answers

Still need help?
Stuck Mid-Setup or Hit a DNS Error?
If your domain won't verify or Shopify's flagging an SSL or Cloudflare proxy issue, we're happy to look at your DNS records with you and figure out what's going on.