The Hyvä Theme has become one of the most popular frontend solutions for Magento 2 due to its speed and simplicity. Unlike the default Luma theme, Hyvä removes heavy JavaScript dependencies and uses Alpine.js and Tailwind CSS for a lightweight frontend.
In this step-by-step guide, you will learn how to create a custom module/extension that works properly with the Hyvä Theme.
New to Hyvä? Start with our Hyvä Theme answers hub for the fundamentals before diving into custom module development.
Prerequisites
Before starting, make sure you have:
- Magento 2.4.4 or higher installed
- Hyvä Theme installed and working
- Basic knowledge of Magento module development
- Access to terminal/CLI
This guide is written against the current Hyvä module conventions, including the hyva_ layout handle pattern covered later. If you’re on an older Hyvä release, check the official Hyvä documentation to confirm the same conventions apply to your version.
Understanding Hyvä Compatibility
Hyvä does not use RequireJS or KnockoutJS like the Luma theme. Instead, it relies on:
- Alpine.js
- Tailwind CSS
- PHP templates
Hyvä also doesn’t support LESS-based styling the way Luma does. Tailwind CSS utility classes are the standard approach for all frontend styling.
Because of this, many traditional Magento frontend modules require adjustments to work with Hyvä.
One distinction worth knowing: if you’re making an existing third-party module Hyvä-compatible, the convention is to prefix the compatibility module with Hyva_, for example Hyva_VendorModuleName. That’s different from what we’re doing in this guide. Since we’re building a brand-new custom module rather than patching an existing one, it just uses your own vendor namespace with no special prefix.
There’s a related difference in how the two are registered. A third-party compatibility module usually needs to register itself using frontend/di.xml, since it’s overriding existing templates without touching layout XML directly. A custom module like the one you’re building here doesn’t need that, it has its own dedicated files and isn’t overriding anything that already exists.
Step 1: Create Module Folder Structure
Create your custom module inside app/code:
app/code/Vendor/HyvaCustom/
Basic structure:
Vendor/
└── HyvaCustom/
    ├── registration.php
    ├── etc/module.xml
    └── view/frontend/
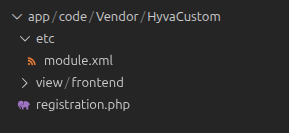
Step 2: Create registration.php
<?php
use Magento\Framework\Component\ComponentRegistrar;

ComponentRegistrar::register(
    ComponentRegistrar::MODULE,
    'Vendor_HyvaCustom',
    __DIR__
);
This file registers your module with Magento. Without it, Magento has no way of knowing your module exists at all, no matter how correctly the rest of your files are set up. The module name you pass here, Vendor_HyvaCustom in this example, needs to match exactly what you use in module.xml in the next step.
Step 3: Create module.xml
File: etc/module.xml
<?xml version="1.0"?>
<config xmlns:xsi="http://www.w3.org/2001/XMLSchema-instance"
        xsi:noNamespaceSchemaLocation="urn:magento:framework:Module/etc/module.xsd">
    <module name="Vendor_HyvaCustom" setup_version="1.0.0"/>
</config>
Step 4: Enable the Module
Run the following commands:
bin/magento setup:upgrade
bin/magento cache:flush
If everything is correct, your module is now active. You can confirm this by running bin/magento module:status Vendor_HyvaCustom, it should show up under “Enabled modules.”
If it doesn’t show up, check two things first. Make sure your namespace and module name match exactly across registration.php and module.xml, a small typo in either file is the most common reason a module silently fails to register. Also check var/log/system.log for any errors thrown during setup:upgrade, Magento usually tells you exactly what went wrong.
Step 5: Create Hyvä-Compatible Template
In Hyvä, frontend templates are simpler because there is no KnockoutJS. Create a template file:
view/frontend/templates/example.phtml
<?php
/** @var \Magento\Framework\View\Element\Template $block */
?>

<div x-data="{ open: false }" class="p-4 bg-neutral-100">
    <button @click="open = !open" class="bg-blue-500 text-white px-4 py-2">
        Toggle Message
    </button>

    <div x-show="open" class="mt-2">
        Hello from Hyvä Custom Module!
    </div>
</div>
Built using lightweight JavaScript (Alpine.js) and styled with Tailwind CSS, making it fast, simple, and fully compatible with Hyvä Theme.
Step 6: Create Layout XML
Important: Use the hyva_ Layout Handle (Hyvä Best Practice)
In Hyvä Theme development, you should use the hyva_ prefix for layout XML files when your changes are intended only for the Hyvä frontend.
This ensures your customization does not affect the Luma theme or other frontends and keeps your module clean and compatible.
When to Use the hyva_ Prefix
- When the layout update is Hyvä-specific
- When your template uses Alpine.js or Tailwind
- When you want to avoid affecting Luma
- When building Hyvä compatibility modules
When NOT to Use It
- If the layout must work for both Luma and Hyvä
- If the block is backend/admin related
- If the module is completely frontend-agnostic
Step Update: Create Hyvä-Specific Layout XML
Instead of using:
view/frontend/layout/default.xml
For Hyvä-specific changes, create:
view/frontend/layout/hyva_default.xml
This layout will only load when the Hyvä Theme is active.
<?xml version="1.0"?>
<page xmlns:xsi="http://www.w3.org/2001/XMLSchema-instance"
      xsi:noNamespaceSchemaLocation="urn:magento:framework:View/Layout/etc/page_configuration.xsd">

    <body>
        <referenceContainer name="content">
            <block class="Magento\Framework\View\Element\Template"
                   name="hyva.custom.block"
                   template="Vendor_HyvaCustom::example.phtml"/>
        </referenceContainer>
    </body>
</page>
- ✅ Loads only in Hyvä
- ✅ Keeps Luma untouched
- ✅ Recommended by the Hyvä team
Official reference: Hyvä Layout Handles Documentation
Step 7: Deploy Static Content
bin/magento setup:static-content:deploy -f
bin/magento cache:flush
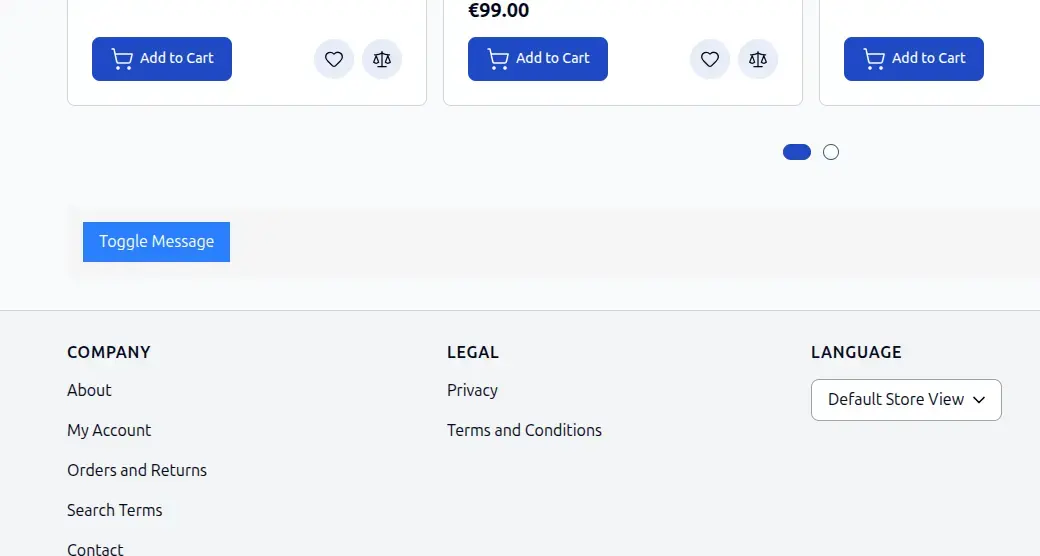
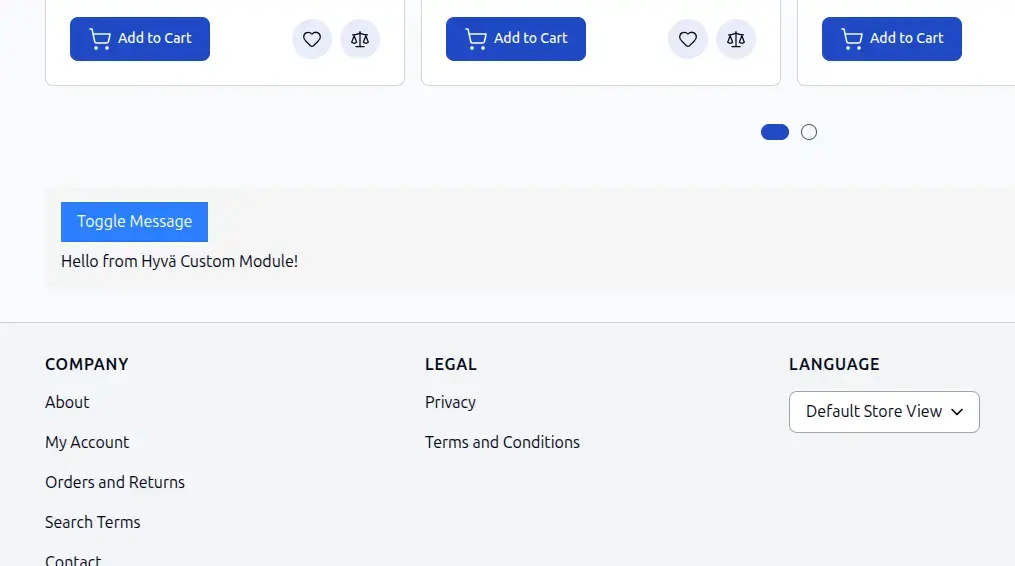
Now check your frontend. You should see the “Toggle Message” button, and clicking it should reveal the hidden text without a page reload, that’s Alpine.js handling the interaction entirely in the browser.
If nothing shows up, check these first:
- Confirm the block actually renders by viewing the page source and searching for
hyva.custom.block - Make sure you’re viewing the page with the Hyvä theme active, not Luma, since
hyva_default.xmlonly loads for Hyvä - Open your browser console for JavaScript errors, a missing or misconfigured Alpine.js build is the most common cause of a silent failure
Here’s what it looks like once it’s working. Before clicking, only the button is visible:
After clicking, Alpine.js reveals the message instantly, no page reload, no extra JavaScript library:
Step 8: Build Your Tailwind CSS
Step 8: Build Your Tailwind CSS
Running setup:static-content:deploy and cache:flush is not enough on its own. Those
commands copy static assets, they don’t compile Tailwind. If you skip this step, your new template’s classes
simply won’t exist in the compiled stylesheet, and nothing will render even though the module works perfectly.
How you do this depends on which Tailwind version your Hyvä theme is running.
Check Your Tailwind Version First
composer show hyva-themes/magento2-default-theme
Hyvä Theme 1.4 and above use Tailwind CSS v4. Anything below that is on Tailwind v3. The build process is different for each, so confirm this before proceeding.
Tailwind v3: Add Your Module Path
In your theme’s web/tailwind/tailwind.config.js, add your module’s template path to the
content array:
module.exports = {
  content: [
    '../../**/*.phtml',
    '../../../../../../code/Vendor/HyvaCustom/**/*.phtml',
  ],
}
Then build from the theme’s tailwind directory:
cd app/design/frontend/Vendor/your-theme/web/tailwind
npm install
npm run build
Tailwind v4: Add a @source Directive
Tailwind v4 dropped tailwind.config.js in favor of CSS-first configuration. Instead of editing a JS
config, open web/tailwind/tailwind-source.css and add a @source line pointing to your
module:
/* My custom module templates */
@source "../../../../../../code/Vendor/HyvaCustom/**/*.phtml";
Then build the same way:
cd app/design/frontend/Vendor/your-theme/web/tailwind
npm install
npm run build
The build script runs Hyvä’s source generation first, then compiles tailwind-source.css
into web/css/styles.css.
Redeploy After Building
Once the CSS is compiled, redeploy and clear the cache so Magento picks up the new file:
bin/magento setup:static-content:deploy -f
bin/magento cache:flush
Best Practices for Hyvä Modules
- Avoid RequireJS and jQuery
- Prefer Alpine.js for interactivity
- Use Tailwind utility classes
- Keep templates lightweight
- Follow Magento coding standards
Common Mistakes to Avoid
- Using KnockoutJS in Hyvä templates
- Adding RequireJS dependencies
- Forgetting to deploy Tailwind build
- Overriding unnecessary core files
FAQ
Does this approach also work with Hyvä Checkout?
Do I need to know Tailwind CSS and Alpine.js before starting?
x-data and x-show, and Tailwind provides utility classes for styling. Both are easier to pick up than RequireJS and KnockoutJS, which is part of why Hyvä feels lighter to work with.
Can I convert an existing Luma module to Hyvä instead of starting from scratch?
Final Thoughts
Creating a custom module for the Hyvä Theme is actually simpler than traditional Magento frontend development. Because Hyvä removes heavy dependencies, your modules become faster, cleaner, and easier to maintain.
If you are building new Magento functionality, always consider Hyvä compatibility from the beginning to avoid rework later.
Creating a custom module for the Hyvä Theme is actually simpler than traditional Magento frontend development. Because Hyvä removes heavy dependencies, your modules become faster, cleaner, and easier to maintain.
If you are building new Magento functionality, always consider Hyvä compatibility from the beginning to avoid rework later.
Stuck on a Hyvä compatibility issue?
We build and fix custom Hyvä modules every week. If something isn’t rendering right or a third-party extension won’t cooperate, we can take a look.

Passionate Magento developer with expertise in custom module development, Hyvä themes, and Adobe Commerce. Dedicated to creating high-quality, maintainable solutions that improve performance and user experience.