Introduction to Shopify Theme Customization
Here’s the truth: nobody buys from a store that looks half-finished. Before a customer even scrolls to your products, they’ve already decided in about three seconds whether your site looks trustworthy or not. That’s exactly why Shopify theme customization matters so much and why it’s worth doing properly instead of rushing it.
The usual culprits are small ones: a crooked banner, a font that doesn’t match your logo, a menu that breaks on mobile. Any one of these can quietly chase people away. The good news is you don’t need to hire a developer to fix any of it. Shopify’s built-in theme editor lets you drag, click, and tweak your way to a store that actually looks like your brand, no code required. This guide walks you through the entire process of customizing a Shopify theme, start to finish, the way you’d actually do it yourself.
What Is Shopify Theme Customization, Really?
Shopify theme customization is the process of changing a store’s colors, fonts, layout, images, and content through Shopify’s built-in editor, without writing any code. In practice, it’s what makes a store look and feel like you, instead of looking like every other default Shopify site out there.
It sounds cosmetic, but it isn’t. A store that feels intentional gets more trust, more time-on-page, and yes, more sales. Before we get into the how, it also helps to know Shopify’s own take on the basics. Their theme customization documentation is worth keeping open in another tab while you work.
Before You Start Shopify Theme Customization: Pick the Right Theme
Here’s a step a lot of tutorials skip: real Shopify theme customization actually starts with choosing the right theme, not opening the editor. Every current Shopify theme, including the free default, Dawn, runs on what Shopify calls Online Store 2.0. In plain English, this just means you can add sections and blocks to almost any page, not just your homepage like in the old days. If you’re working with an older or custom-built theme, Shopify’s own guide on theme versions and Online Store 2.0 compatibility is worth checking before you commit to it.
Because this decision shapes everything you do later, check these things first:
- Is it Online Store 2.0 compatible? Almost everything in the current theme store is. However, older or custom-built third-party themes sometimes aren’t, so it’s worth double-checking.
- Free or paid? Free themes like Dawn, Refresh, and Sense are lean and well-supported by Shopify itself. Paid themes, on the other hand, tend to come loaded with extra sections and presets, which can be worth it if your store has specific needs (think subscriptions, bookings, and huge catalogs). Browse the full range on the Shopify Theme Store to compare options side by side.
- How fast does it load? A gorgeous theme that takes six seconds to load will lose you customers before they even see it. So, before you fall in love with it, test the demo store’s speed first.
Duplicate Your Shopify Theme First: Seriously, Don’t Skip This
Before you change a single pixel, make a copy of your theme. Think of it as a safety net for your Shopify theme customization work: if you break something (and at some point, you probably will), your live store stays exactly as it was.
- First, log in to your Shopify admin.
- Next, head to Online Store → Themes.
- Scroll down to your Theme library and find the theme you want to edit.
- Now click the three dots (…) next to it.
- Finally, hit Duplicate.
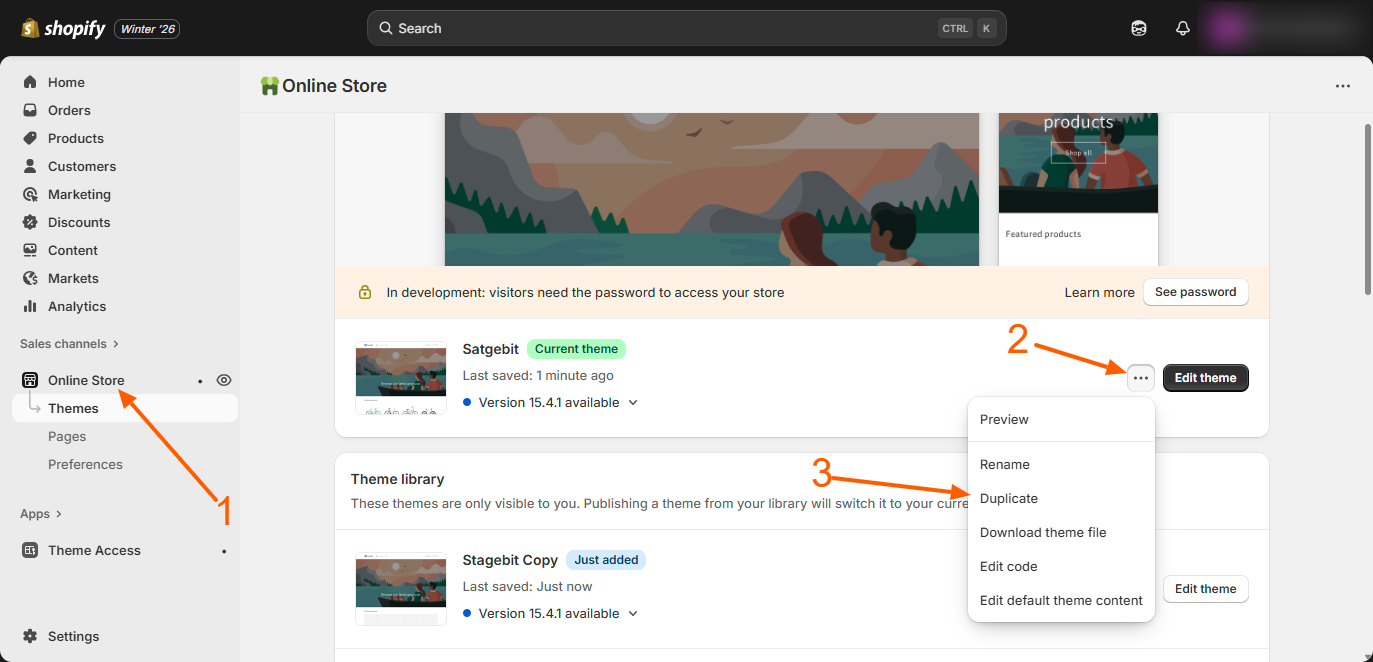
As soon as that’s done, Shopify will drop a copy right into your Theme library. From here on, that copy is your playground, so always run your Shopify theme customization on the duplicate, never on the live theme your customers are actually seeing.
You Can Also Undo Mistakes Without Starting Over
Even with a duplicate theme, you don’t have to rebuild from scratch if something goes wrong mid-edit. The theme editor keeps a version history, so you can open the clock icon in the top bar and jump back to an earlier save instead of redoing the last twenty minutes of work by hand. It won’t replace duplicating your theme first, since that still protects your live store, but it’s a second layer of safety worth knowing about before you actually need it.
Step 1: Open the Shopify Theme Customization Editor
- First, go to Online Store → Themes.
- Then, under Current theme, click Edit theme. Or, on your duplicate, click the three dots and choose Edit.
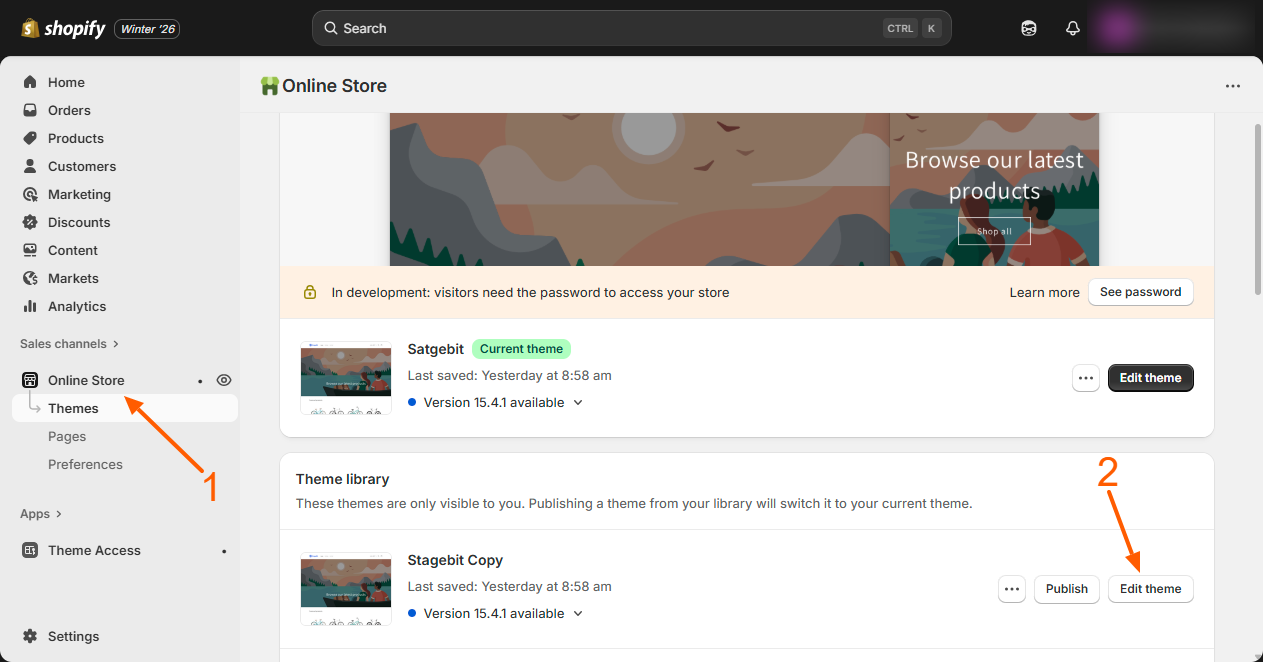
Once it opens, the editor shows a live preview of your store, so every tweak shows up instantly. It’s a bit like decorating a room while standing inside it: you see the result as you go, not after.
Step 2: Learn the Shopify Theme Editor Layout
Before diving into customization, it helps to know where everything lives. The editor has three main areas:
- Top bar: Save, undo, redo, and the desktop/mobile preview toggle.
- Left sidebar: Where you’ll find sections, blocks, and global settings.
- Main preview: Your actual storefront, live and clickable.
Step 3: Sort Out Your Header and Announcement Bar
First, the announcement bar is your megaphone: free shipping thresholds, sales, quick notices, whatever you want people to see the second they land. Then, right below it, the header holds your logo, main navigation, and overall color scheme. Because this is the very first thing anyone sees, it’s one of the highest-impact parts of any Shopify theme customization project.
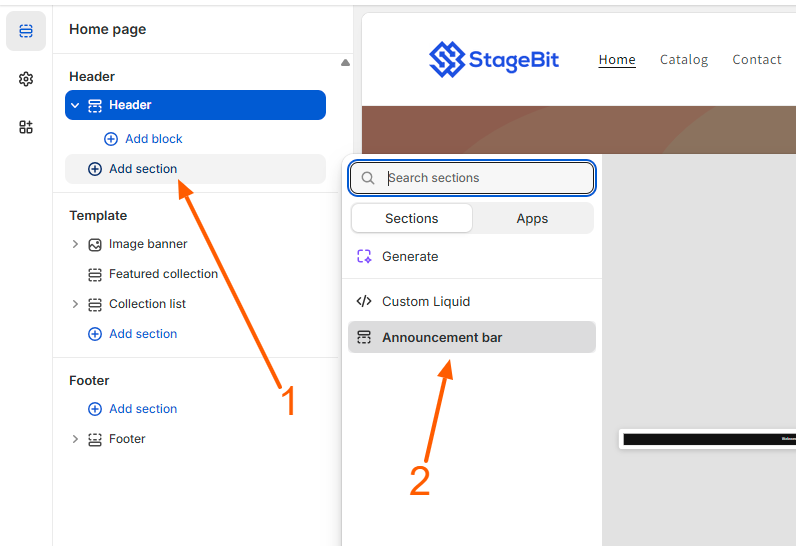
Step 4: Get to Know Sections, Blocks, and App Blocks
Sections
A section is a large, self-contained building block on a Shopify page, such as a header, footer, image banner, featured collection, or email signup box. Each one can be added, removed, or rearranged on its own, so think of sections as the furniture in a room.
Blocks
Meanwhile, blocks live inside sections as smaller pieces, like a single button, a text snippet, an image, or a product detail. So if sections are the furniture, blocks are basically the cushions and lamps you arrange on top of it.
App Blocks (a nice Online Store 2.0 perk)
Here’s something a lot of beginners don’t realize: with Online Store 2.0 themes, apps you’ve installed, such as reviews widgets, upsell popups, or loyalty programs, can often be dropped straight into a section as an app block, right from the editor. In short, no code and no developer needed. It’s one of the more underrated upgrades to Shopify theme customization in recent years.
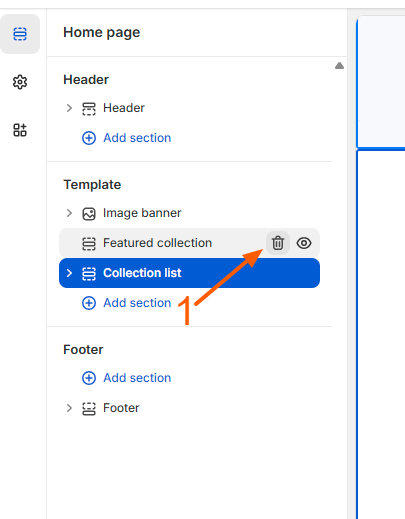
Step 5: Add, Move, or Delete Sections
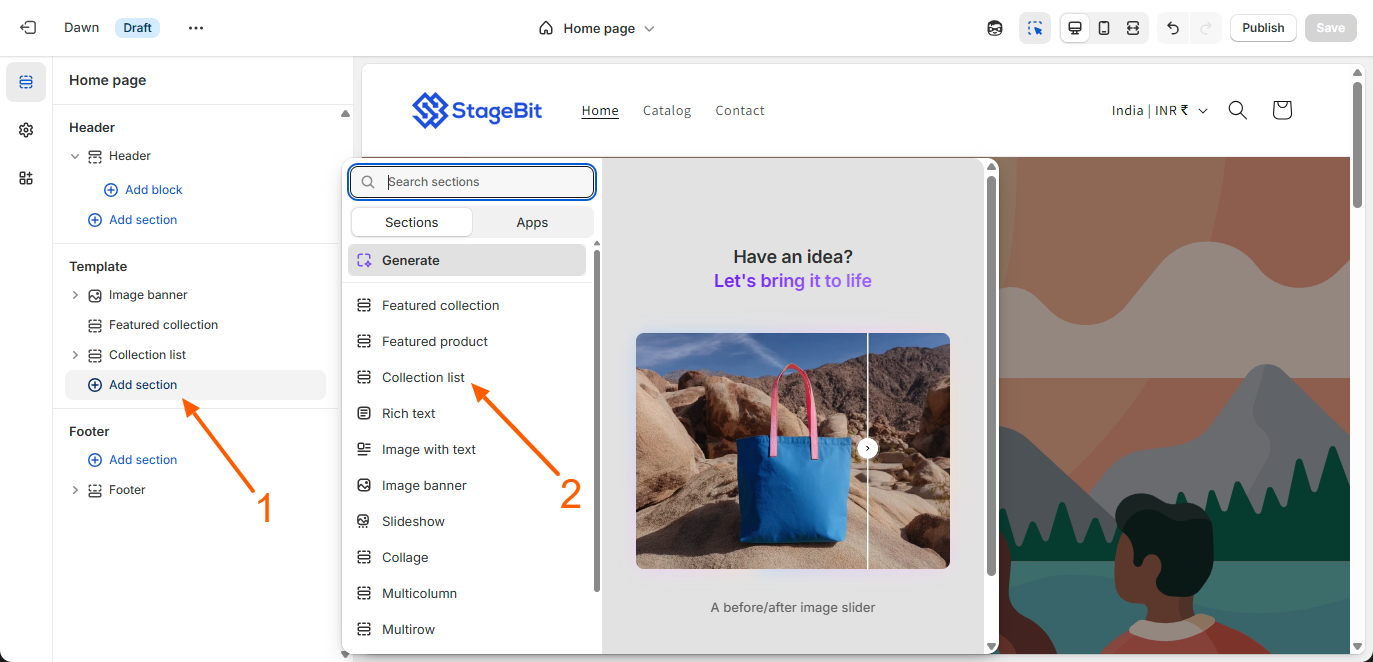
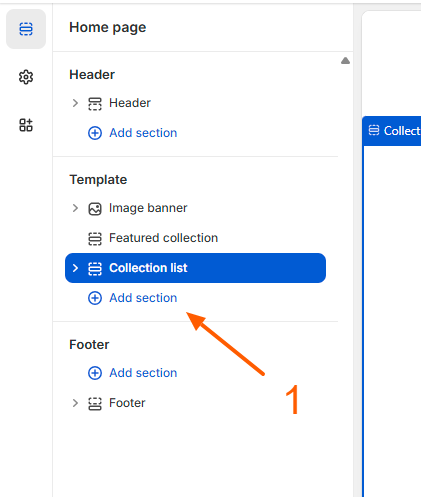
First, click on any section, say, an image banner, and you can edit its content, colors, and layout right there. After that, rearranging things is just as easy:
- Add a section: Click “Add section.”
- Move a section: Grab the handle icon and drag it.
- Remove a section: Click the trash icon.
Step 6: Don’t Forget the Footer
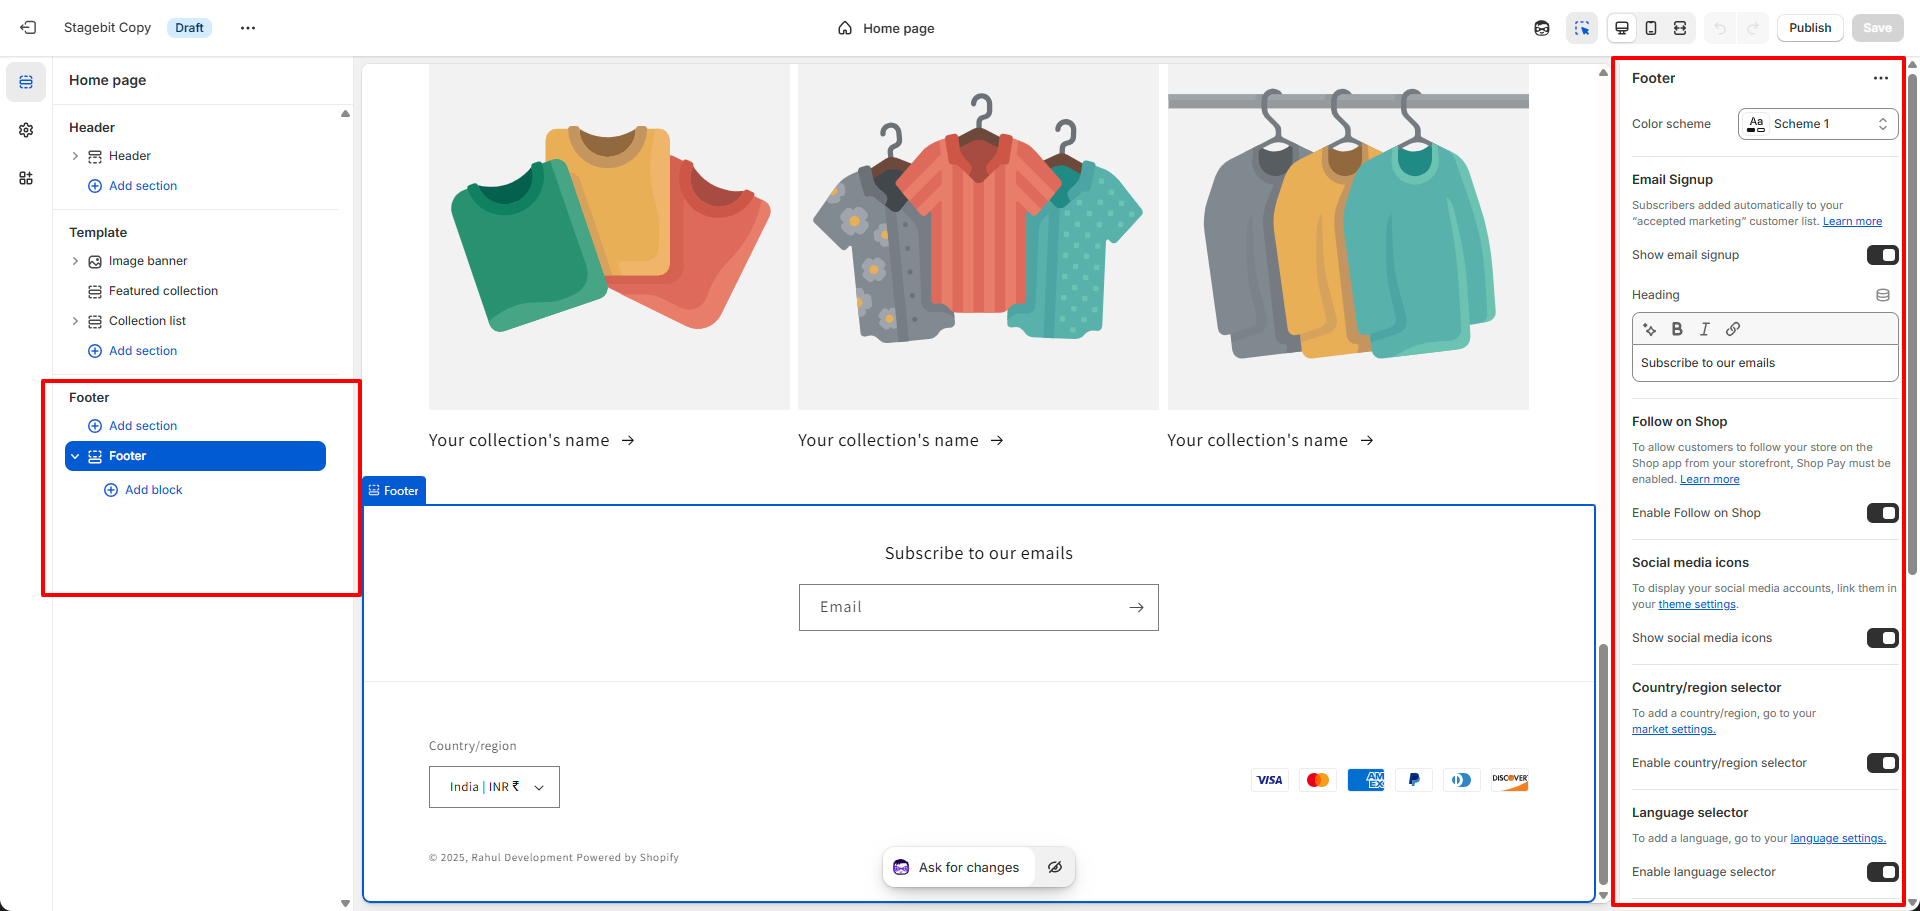
Admittedly, it’s easy to treat the footer as an afterthought, but it usually holds your social links, store policies, and payment icons, and it shows up on every single page. As a result, a typo or broken link here isn’t a one-page problem, it’s a whole-site problem. So, before you publish, give it one more look.
Step 7: Global Settings for Shopify Theme Customization
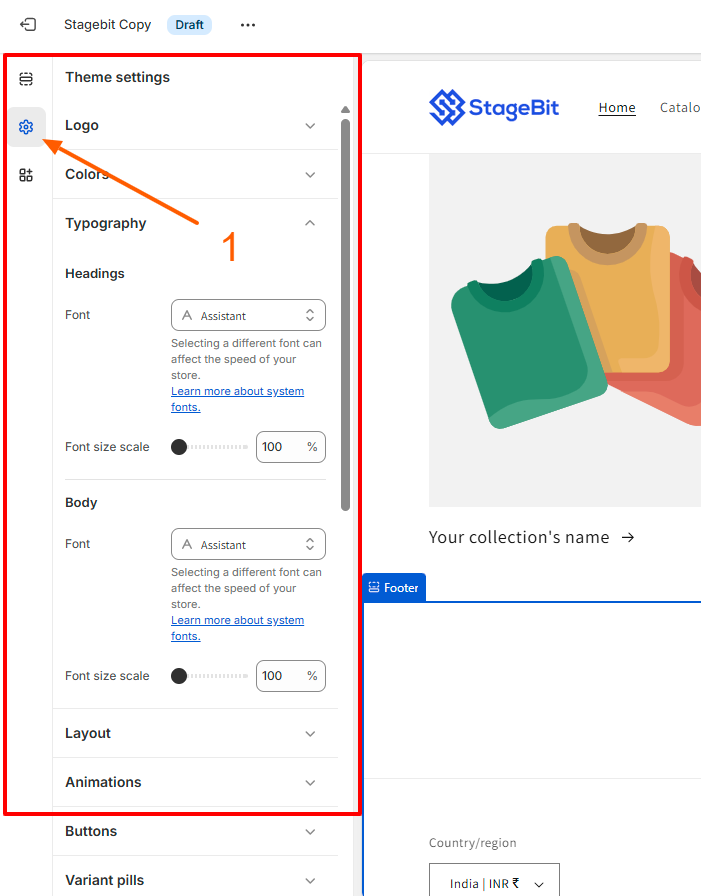
Next, click the gear icon labeled Theme settings and you’ll land in the control room for your entire store. Because these settings apply everywhere, they matter so much for keeping your brand consistent.
Before you start adjusting things one by one, check if your theme has built-in presets. Most current themes ship with two or three ready-made style combinations, different fonts and colors bundled together, that you can switch between with a single click. Trying a preset first can save you a lot of manual tweaking, and it’s a quick way to see your store in a completely different mood before you commit to customizing anything by hand.
| Setting | What it controls |
|---|---|
| Logo | Logo and favicon uploads |
| Colors | Background, button, and text colors |
| Typography | Font selection and sizing |
| Layout | Page width and spacing |
| Animations | Hover and scroll effects |
| Buttons | Primary and secondary button styles |
| Variant pills | Size and color selector design |
| Input | Form field and search bar styling |
| Product cards | Visuals for the product grid |
| Collection cards | Styling for category boxes |
| Blog cards | Layout for your blog articles |
| Content containers | Design of section boxes |
| Media | Image and video styling options |
| Dropdowns and pop-ups | Menus and pop-up alerts |
| Drawer | Cart drawer style and behavior |
| Badges | Sale and New labels for products |
| Brand information | Your brand description and links |
| Social media | Connection to social platforms |
| Search behavior | Live search settings |
| Currency format | Price display options |
| Cart | Layout of the checkout journey |
| Custom style | Adding custom CSS code |
| Theme style | Applying theme presets |
Step 8: Customize Each Page Type on Its Own Terms
By default, you’ll see your homepage. However, you can use the page selector up top to jump between your Product, Collection, and Blog templates, and customize each one separately. After all, a layout that looks great on your homepage can feel cramped or out of place on a product page, so don’t assume one size fits all here.
Editor, Custom Code, or an App: Which Fits Your Shopify Theme Customization?
This trips up a lot of beginners, so here’s a simple way to think about it:
| Method | Best for | Coding needed? | Flexibility |
|---|---|---|---|
| Theme Editor | Colors, layout, sections, everyday content changes | Nope | Moderate |
| Custom Liquid/CSS | Truly unique layouts or features the editor can’t do | Yes (HTML/Liquid/CSS) | High |
| Apps | Reviews, upsells, loyalty programs, advanced search | Usually not | Moderate–High |
Overall, here’s a simple rule that’ll save you time: start with the editor. Then, if you need a feature rather than a look, try an app before writing any code. Only reach for custom code when neither of those covers what you’re going for, and either way, always test it on your duplicate theme first, not your live one.
Quick Mobile Checklist for Your Shopify Theme
Since most of your traffic is probably arriving on a phone, give the mobile preview real attention, not just a glance:
- Banner text and buttons aren’t getting cut off or squished
- The nav menu doesn’t fall apart if you have long menu titles
- Text is actually readable without someone pinching to zoom
- Product images aren’t cropping out the important part
When Shopify Theme Customization Goes Wrong
A few things trip up almost everyone at some point, so here’s how to fix them fast:
- “My changes aren’t saving!” First, check that you actually clicked Save in the top bar. The live preview updates instantly, but nothing sticks until you save it.
- “This section won’t show up on one specific page.” In that case, you’re probably editing the wrong template, so double-check the page selector.
- “I can’t find a setting I know exists.” Sometimes settings live inside a specific section, and other times they live in the global Theme settings. So if it’s not in one, check the other.
- “It looked right, then I published and it changed.” In this case, make sure you published the duplicated theme you were actually working on, not the old live one, under Online Store → Themes → Publish.
Step 9: Preview, Save, and Publish Your Customized Theme
Last stretch: here’s how to send it live without any surprises:
- First, check both the desktop and mobile previews carefully, not just one.
- Then, hit Save after any change worth keeping.
- Finally, only publish the duplicated theme once you’re genuinely happy with it.
Shopify Theme Customization Habits That Actually Pay Off
- Always work on a duplicate, never the live theme.
- Keep your fonts and colors consistent across every page.
- Compress your images before uploading, because big files are the #1 silent killer of site speed. If speed is a concern beyond just image size, our eCommerce speed audit guide covers what else to check.
- Also, test on a real phone, not just the editor’s preview.
- Finally, glance at your Shopify speed report every so often, especially after a big redesign.
Mistakes Worth Avoiding
- Editing your live theme directly (please don’t).
- Skipping the mobile view entirely.
- Piling on animations until the page feels busy instead of polished.
- Uploading massive, uncompressed images.
- Forgetting to re-check your footer and nav links after making changes.
Shopify Theme Customization FAQs
Can I customize a Shopify theme for free?
Do I need to know how to code for Shopify theme customization?
Will Shopify theme customization affect my SEO?
What’s actually the difference between a section and a block?
Should I just hire someone instead of doing this myself?
For everyday layout, color, and content tweaks, doing your own Shopify theme customization works fine. However, if you need something genuinely custom, like a layout or feature the editor can’t handle, that’s when a Shopify Expert or developer starts to make sense.
If you’ve hit a wall the editor genuinely can’t solve, whether that’s a custom section type, an integration that needs real code, or a redesign bigger than swapping colors, that’s when it makes sense to bring in a developer instead of fighting the editor for another weekend. Our Shopify development team can take it from there.
Wrapping Up Shopify Theme Customization
Shopify theme customization isn’t complicated once you know the order of operations: pick a solid Online Store 2.0 theme, duplicate it before you touch anything, then work through sections, blocks, and global settings one at a time. Follow that, and you’ll end up with a store that looks like you actually meant it, no developer required.
So, if you’re setting up a new store, your next stop should probably be How to Add Products to Shopify: Step-by-Step Guide for Beginners .

4 years of experience building client websites and custom WordPress plugins. Specializes in WordPress, Shopify, and Laravel development with hands-on experience developing and deploying a custom Shopify app.